The du (short for “disk usage”) command is a standard Unix/Linux command-line utility used to check and estimate the space used by files and directories on a filesystem. It’s a valuable tool for anyone looking to understand and manage their system’s disk space, as it can help you identify large files or directories that might be consuming significant storage.
Understanding the Basics of the ‘du’ Command
At its most basic, you can use the du command by entering it into the terminal followed by the file or directory you wish to analyze:
du /path/to/directory
2122504	./file1
32	./file2
2122536	.
This will output the total disk space used by that directory and all its subdirectories, listed in kilobytes.
For a more detailed view that includes every individual file, you can add the -a (all) flag:
du -a /path/to/directory
2122504	./file1
32	./file2
2122536	.
Decoding ‘du’ Output
The du command outputs two columns: the first column represents the space used by the file or directory, and the second column is the path to that file or directory.
Keep in mind that du uses kilobytes as its default unit. If you want the output in a different unit, you can use the -h (human-readable) flag to display it in a more comprehensible format:
du -h /path/to/directory
1.0G	./file1
 16K	./file2
  1G	.
This will convert the output to the largest appropriate unit (e.g., B for bytes, K for kilobytes, M for megabytes, G for gigabytes, etc.).
Summarizing with ‘-s’
If you’re only interested in the total disk usage of a directory, without the usage for each subdirectory, use the -s (summary) flag:
du -sh /path/to/directory
2.9G	/path/to/directory
‘du’ with ‘-c’ to get a Grand Total
If you want a grand total of multiple directories or files, the -c option will come in handy:
du -csh /path/to/dir1 /path/to/dir2
2.9G	/path/to/dir1
 13G	/path/to/dir2
 16G	total
This will list the sizes of dir1 and dir2, and then give a grand total at the end.
Excluding Files or Directories
If you wish to exclude certain files or directories from being included in the disk usage summary, you can do so with the --exclude (or -I “*.mp4” on macOS) flag:
du -sh --exclude="*.mp4" /path/to/directory
6.6G	/path/to/directory
This example will calculate the disk usage for the directory but exclude all .mp4 files.
‘du’ and Max Depth
When working with deeply nested directory structures, it might be useful to limit the depth of the du command’s output. This can be achieved using the --max-depth (or -d 1 on macOS) option:
du -h --max-depth=1 /path/to/directory
 13G	/path/to/directory
This command will show disk usage for the directory and its immediate subdirectories only.
Overcoming the “Operation not permitted” issue on macOS
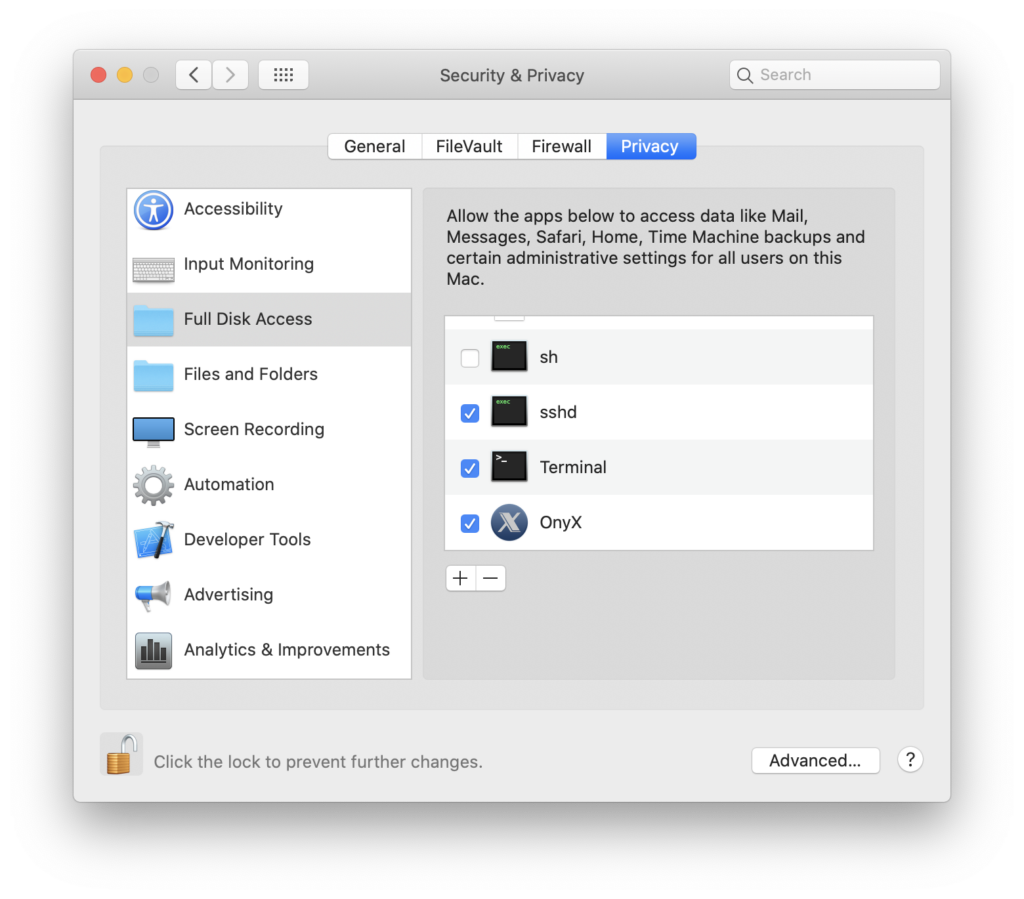
In some cases when using the du command on macOS, you might come across an “Operation not permitted” error message. This is a security feature built into macOS that requires explicit user permission for Terminal to access certain directories.
To resolve this issue, navigate to your macOS System Preferences and select “Security & Privacy”. Then click on the “Privacy” tab and scroll down to “Full Disk Access”. You will need to click the lock icon in the bottom left to make changes. After you enter your password, click on the “+” button, locate “Terminal” in the list, and add it. This will give the Terminal full access to disk operations, and you should no longer encounter the “Operation not permitted” error.

Conclusion
The du command is an essential tool for managing disk space in Unix/Linux environments. Its versatility and comprehensive reporting capabilities make it an indispensable utility for any user or system administrator. However, as with any powerful tool, it requires understanding and practice. Invest time in mastering the du command, and you’ll have a much more detailed understanding of your system’s disk usage.
